
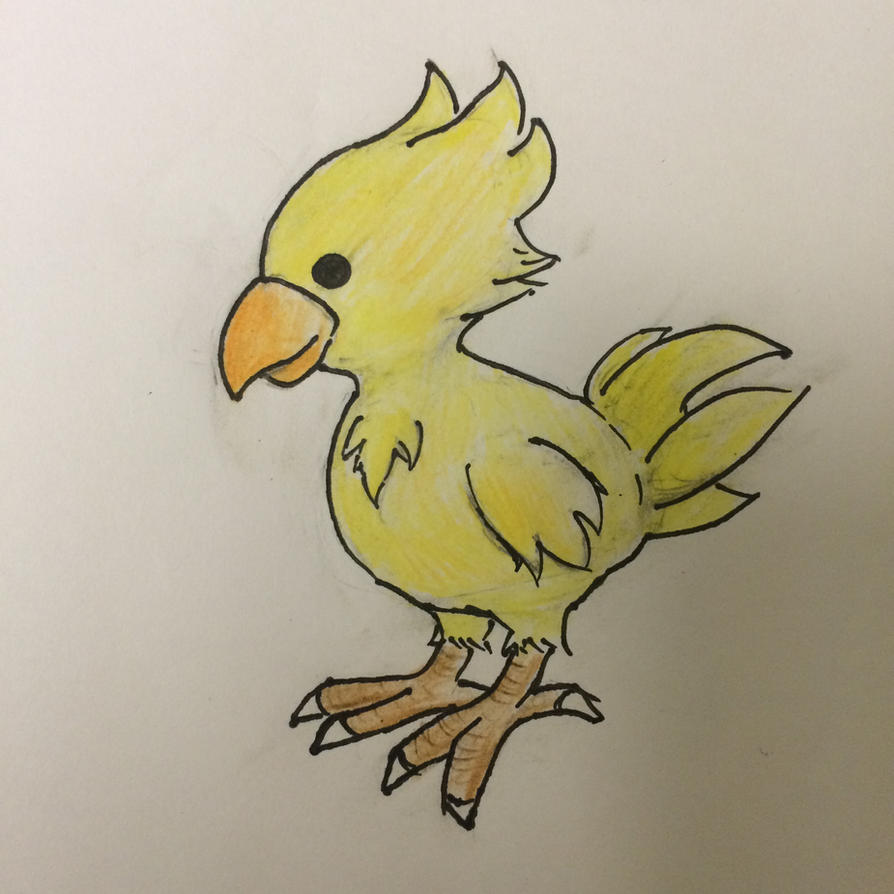
This post has hit 12k hits since published (29/12/2014)! Thanks for all the interest people! It's currently Dec 2016, and I am finally making my second chocobo. Yes, my second one. I have never had the chance to remake it in the end until two years later. I am going to add some more photos and fix some patterns for this chocobo, as I realized I wrote a lot of mistakes. Enjoy!

Have been wanting to write this up and post this every since I made it, and finally, it's up! The instructions may be incomplete because there's some part that I just did without noting it down. But I think it's really self-explanatory, you can figure it out without having to tell you what to do with that section/part.
But of course, if you have any question, leave me a comment in this blog post or you can e-mail me too. I'll be happy to help. :)
**I also sell this item on my Etsy shop. If you would like to have this item but you don't know how to crochet, you can order them from me. **
Materials
3.00mm crochet hook
Minlon Acrylic yarn (or any sport weight yarn)
# yellow
# orange
# brown
# white
eye washer
pipe cleaner/wire
Embroidery needle
Abbreviation
ch - chain
sk - skip stitch
ss - slip stitch
sc - single crochet
hdc - half double crochet
dc - double crochet
inc - increase
dec - decrease
* or * * - repeat following pattern until row ends
* * xA - repeat instr inside for A times
MR - Magic ring
FLO - front loop only
BLO - Back loop only
F/O - finish off
Some basic explanation for the pattern I have written
"inc" means sc x2 in the next sc
"inc by 3" means sc x3 in the next sc
"2sc" means sc x1 in the next sc, repeat 2x
"2inc" means sc x2 in the next sc, repeat 2x
It is advisable to crochet out all the parts first before you sew them together so that you can adjust the parts accordingly.
Head
Use yellow yarn
R1: 6sc in MR (6)
R2: *inc (12)
R2: *inc (12)
R3: *sc (12)
R4: *sc, inc* (18)
R5: *2sc, inc* (24)
R6-9: *sc (24)
R10: *2sc, dec* (18)
Insert eyes & stuff!
Insert eyes & stuff!
R11: *sc, dec* (12)
R12: *dec (6)
F/O and leave a long tail.
Head feather |
| I attached the eyes between R4-5, 6 sc apart |
Use yellow yarn
MiddleR1: 3sc in MR (3)
R2: sc, inc, sc (4)
R3: sc, 3hdc in next sc, dec (5)
R4: sc, 3hdc in next sc, sc, dec (6)
Sides - make 2
R1: 3sc in MR (3)
R2: sc, inc, sc (4)
R3: sc, 3hdc in next sc, dec (5)
I attached the head feather as how I doodle them. Meaning, I followed the curve. The curve from the middle will be very obvious, so it's easy. As for the sides, there might be only a slight curve, but you can look at the stitches to know which direction it curves to.
And then I placed all three of them in this shape if you look from above (the beak facing upwards).
/ | \
Body
Use yellow yarn
R1: 6sc
in MR (6)
R2: *inc (12)
R2: *inc (12)
R3: *sc,
inc* (18)
R4: *2sc,
inc* (24)
R5-9: *sc
(24)
R10: *4sc, dec* (20) *corrected version, thanks to GothicSoprano for pointing this out!*
R11-12: *sc (20)
R13: *8sc, dec* (18)
Stuff!
Stuff!
R14: *sc (18)
R15: *sc, dec* (12)
R16: *dec (6)
F/O
 |
| Attach the head to the body (around R3-6 of the body) |
Beak
Use Orange yarn
Part 1
R1: 3sc in MR
R2: *inc (6)
R3: *sc, inc* (9)
R4: 3sc, 2 inc, 3sc, 1ch, turn (10)
R5: inc, 4ss, inc (8)
Ss into next sc and F/O.
Part 2
2ch, 3sc in the first ch (3)
Now we make the thin line of the sides
ch4, sk1, 6ss, ch4,
turn, sk1, 3ss (9)
F/O and leave a long tail.
When you sew the beak parts on the head, make sure Part 1 is at the top. Align the parts carefully. And on the Part 1 beak, the sides of the beak will have kind of a protruding part, make sure you sew that part into the side to have a more realistic beak shape.
Sorry, there isn't any picture tutorials to show you, I did it in a whim and I forgot to take some pictures. I'll be sure to take some next time when I re-make it.
**Update 09/12/16**
I tried to re-create the realistic beak look but I failed. I don't remember how I did it last time, but below is my current version which is different. I still prefer the old one..... I still have the first chocobo with me, will look for it and figure it out.

 |
| You can sew the lower part of the upper beak to cover away the yellow part if it doesn't destroy the beak look. Else, just use leftover orange yarn to cover them up. |
Tails
Use yellow yarn
Big tail
R1: 3sc in MR (3)
R2: *inc (6)
R3: *sc, inc* (9)
R4: *2sc, inc* (12)
R5: *sc (12)
R6: *2sc, dec* (9)
R7-8: *sc (9)
R9: *sc, dec* (6)
Medium tail - make 2
R1: 3sc in MR (3)
R2: *inc (6)
R3: *sc, inc* (9)
R4-5: *sc (9)
R6: *sc, dec* (6)
Small tail - make 2
R1: 3sc in MR (3)
R2: *inc (6)
R3-4: *sc (6)
R5: *sc, dec* (4)

You can use this picture as a reference on how to arrange the tails or you can make your own version of it. For me, I overlap some parts of the smaller ones onto the bigger ones to have a fan effect.
Wings - make 2
Use yellow yarn
R1: 2ch, turn. 3sc in the first ch, ch1, turn (3)
R2: 3sc, turn (3)
R3: [2ch, hdc, ss] in first sc, [2ch, 2dc, ss] in second sc, [2ch, hdc, ss] in last sc
Sc around the edges but not the rounded parts that we did in R3. Also, make 3sc at the corner stitch.
Use yellow yarn
ch5
hdc & ss into 3rd chain from hook
2ch, 2dc & ss into the next ch
2ch, hdc & ss into the next ch
Sc around the edges but not the rounded parts.
Use yellow yarn
R1: 4sc in MR (4)
R2: (FLO) *ss, 2ch, ss* into same sc x4
F/O.
Use brown yarn
R2: (Continue from back loop of the yellow piece we just made, BLO) *sc (4)
R3-4: *sc (4)
F/O.
F/O.
Nails
This, in my opinion, is the harder part to crochet because of it's tiny details! I even hurt my fingers a lot because of crocheting this part. Some tips regarding the nails, make sure the crochet side facing you (right side) will be facing outwards. To give it a more realistic look, roll the nails around your fingers (like how you do it with a dough when you want the diameter to be smaller, make sense?).
This, in my opinion, is the harder part to crochet because of it's tiny details! I even hurt my fingers a lot because of crocheting this part. Some tips regarding the nails, make sure the crochet side facing you (right side) will be facing outwards. To give it a more realistic look, roll the nails around your fingers (like how you do it with a dough when you want the diameter to be smaller, make sense?).
Short nails - make 2
Use white yarn
R1: 3sc in MR (3)
Use brown yarn
R2: *sc (3)
F/O and leave a tail
Long nails - make 4
Use white yarn
R1: 3sc in MR (3)
Use brown yarn
R2-3: *sc (3)
F/O and leave a tail
For the leg,


 |
| *Click for bigger image |
- Cut a piece of pipe cleaner, make sure it is longer than the leg but shorter than the chocobo body, as we are going to insert this into the body.
- Insert into the leg part at one end and bend a small part at the other to fit the small nail nicely in it. Measure first before you bend.
- Cut another piece of pipe cleaner of much smaller length (3rd picture from left). Insert two long nails onto each of the ends.
- Put the "V" shape onto the main leg. So that they sit well on it. You don't need to glue it as we are going to sew the empty parts.
- Sew around the space to cover up the pipe cleaner.
 |
| The finished look |
You can also use a thin wire but I find that with thin wire, I have to bend the ends to avoid pointy ends coming out. But as you can see in the picture above, it is still visible. I decided to use pipe cleaner instead since they are thinner and easier to bend around.
Insert the ends into the body and sew the legs too.
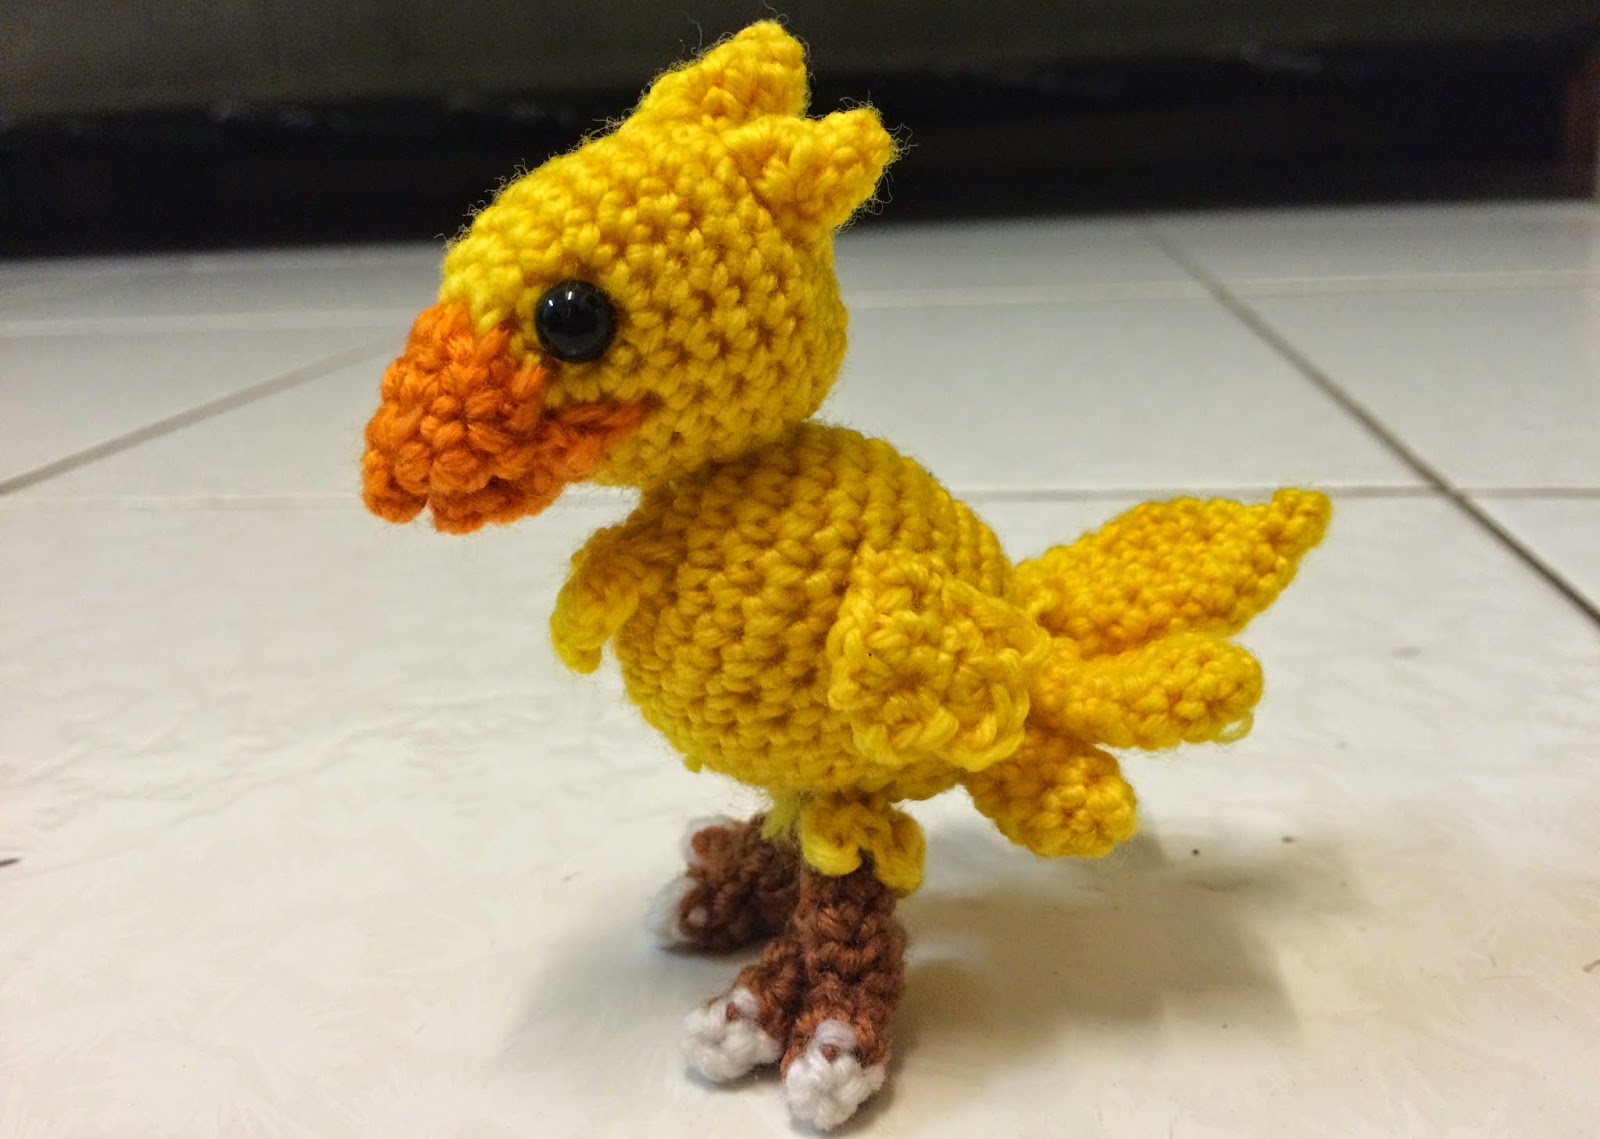
It's done!
 |
| Kweh.... |
 |
| KWEH!! A very excited chocobo. |
The chocobo is actually very flexible, I didn't thought it would be when I made it though. The beak could be opened and closed. The side feathers can be moved. It can sit too. It really feels like a pet to me. Haha.
Link me up with your creation if you used this pattern to make your chocobo! I would be happy to see what you guys have done. :)
If you like what I do, please subscribe to my blog and follow me on Instagram! 
I am on these platforms as well!
**Disclaimer: I do not own this character, this character solely belongs to Square Enix. This is purely a fan-based work and pattern by me. Please do not sell the finished product. Please credit me if you're using this pattern in anyway. Thank you.
Please check R10 of the head too =) I think it should be *2sc, dec* (18), right?
ReplyDeleteoh yes! Thank you for correcting. :D I've edited my post.
Deletethe beak bit dosent make much sense and your pictures look like its was stitched from the main head, i tried 3 or 4 times but nothing comes out looking right like the tops too short and the bottom dosent make sense :/
ReplyDeleteHi Zoe, the beak is indeed sewn (or stitched) on the main head. Maybe you can see more examples on http://www.ravelry.com/patterns/library/small-chocobo-final-fantasy/people to have a better idea perhaps?
DeleteThank you for the pattern! It's so great <3 <3 <3
ReplyDeleteThank you very much for this awesome pattern!
ReplyDeleteNow I have my own personal chocobo, and it looks really great :D
Thank you for this pattern x3
ReplyDeleteI really love it :3
I am a bit confused with the first part of the beak ^^"
R3: *3sc in every sc (9)
I don't know how to interpret this ^^"
If I do 3sc in every sc around, I'll have 15 at the end and then the next row won't be 12 ^^"
And if I just do sc around, I don't have 9 at the end o.o
What am I supposed to do there? ^-^
I hope you can help me ^^"
Thank you :3
Hey there! Sorry, it should be *sc, inc* so that u'll get 9 in the row. I fixed the pattern. Thanks!
DeleteThe head feathers have confused me. Do you have a picture of them before sewn on? Or an idea on how to sew them on?
ReplyDeleteHey ya! Unfortunately I do not have a picture taken from the top of the chocobo. You can place it at any position, I think it will be fine either way as long as it looks okay to you.
DeleteBut anyway, I added some explanation regarding that part if you really need to reference. :)
Hello, I'm a bit confused by the head feathers. I made the magic ring with 3 sc, but when i tightern the ring it create more of a half circle. I'm not sure if im suppose to continue ccrocheting in the round or am I suppose ot work back and forth?
ReplyDeleteHello, u should continue. naturally it becomes a circle
DeleteI prefer the old beak pattern. If I remember it's
ReplyDeleteR1: SC 3 in MR (3)
R2: SC each (3)
R3: SC 3 in each (9)
R4: SC in next 2, Inc (12)
Chain 1
R5: Inc, SS 4, Inc (8)
Is that correct? I'm going off of memory. I had it written down in my phone, then my 4 year old did a factory reset. Here is also a link to some of my chocobo variations https://plus.google.com/collection/E91LmB. I'm working on a white mage chocobo now ^_^.
I am stuck at the head feathers its not coming out right or something can anyone help me i can get to the 3rd round and thats where im lost.....
ReplyDeleteLove your pattern, I'm going to try making this for my husband for christmas, had a question about the eye washers. Is there a particular size or link to where I can find the size needed?
ReplyDeleteWhat size are the eyes for this pattern? I cannot find the size listed in the materials or the pattern itself!!
ReplyDeleteThank tou for you pattern. I love it!
ReplyDeleteThank you for sharing your pattern. Are you still wanting to see others results to your pattern? Do you have tiktok I can tag you in?
ReplyDelete